前言
众所周知,Varnish是一款高性能的开源HTTP加速器,由于其内存级缓存的工作性质,Varnish对网站响应速度的提升是显而易见的。
在众多网站采用SSL连接的今天,Varnish就SSL支持的这一方面就有些捉襟见肘了,按照Varnish官方的文档来看,他们目前为止还没有做适配SSL的打算,作者是这样描述他对Varnish适配SSL这件事的看法:
[kbd]That is not one of the things I dreamt about doing as a kid and if I dream about it now I call it a nightmare.[/kbd]
OK,看样子作者是不太想干这件事了,那么强大的Nginx就能接下这个烂摊子了。
在这篇文章发布之前,网上就有很多对Nginx+Varnish适配SSL的教程了,比如说kn007的这篇:
https://kn007.net/topics/varnish-using-nginx-support-ssl/
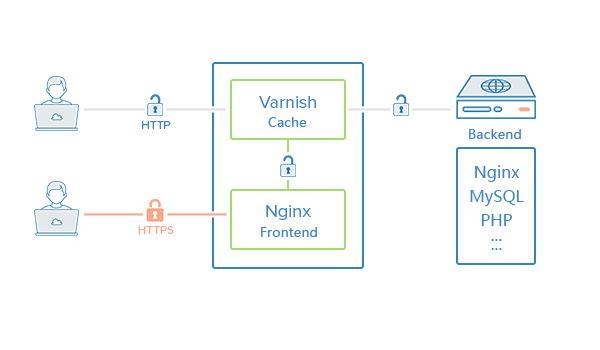
上面的文章中介绍的实现方式如上图所示,在这篇文章中我想提出一种新的思路,或者说基于上图提出的优化思路。在上图中的思路中,如果我想要实现http跳https,也就是不管什么访问全部都建立https连接,由于80端口被Varnish占用,也就是说用户在以http方式请求网站时,是不经过Nginx的,Varnish本身不支持ssl,那只好在Varnish中建立规则转发到443端口也就是Nginx监听的SSL端口,之后Nginx再反代Varnish,这样是挺浪费资源的。所以干脆让Varnish监听非80端口比如默认的6801,Nginx监听80端口,做个301跳转到https,这样做和前面的方法相比,少了一步Varnish到Nginx的转发,对性能提升还是有些帮助的。
示意图如下:
1 2 3 4 5 6 | USER A ------- NGINX:80 (HTTP) | |(301) | USER B ------- NGINX:443 ------- VARNISH:6801 ------- BACKEND:8080 (HTTPS) (RP) (RP) |
OK,既然思路有了,现在就Get It Done:
服务器环境:CentOS 7.2 + Nginx 1.10.3
一、Nginx上SSL的配置(如果之前已经在Nginx上配置过SSL直接跳转第二步)
编辑[kbd]/usr/local/nginx/conf/nginx.conf[/kbd]或者[kbd]/usr/local/nginx/conf/vhost/*.conf[/kbd]一般来说编辑虚拟主机的配置文件就好,第一个文件可以放着。
放出本站的conf给大家参考一下,主要就是修改默认的80端口,添加ssl证书还有密钥以及ssl的配置。
1 2 3 4 5 6 7 8 9 10 11 12 13 14 15 16 17 18 19 20 21 22 23 24 25 26 27 28 29 30 31 32 33 34 35 36 37 38 39 40 41 42 43 44 45 46 47 | server { listen 443 ssl http2;#Nginx版本低于1.10的建议升级成最新版本,旧版本对SSL支持不好或者不支持 server_name edlinus.cn;#修改成你的域名 index index.html index.htm index.php default.html default.htm default.php; root /home/wwwroot/edlinus.cn;#修改成网站的目录 ssl_certificate /usr/local/nginx/conf/ssl/xxx.crt;#这里修改成你的证书文件 ssl_certificate_key /usr/local/nginx/conf/ssl/xxx.key;#这里修改成你的密钥文件 ssl_protocols TLSv1 TLSv1.1 TLSv1.2; #允许的协议 ssl_ciphers EECDH+CHACHA20:EECDH+AES128:RSA+AES128:EECDH+AES256:RSA+AES256:EECDH+3DES:RSA+3DES:!MD5; #加密算法(CloudFlare 推荐的加密套件组) ssl_prefer_server_ciphers on; #优化 SSL 加密套件 ssl_session_timeout 10m; #客户端会话缓存时间 ssl_session_cache builtin:1000 shared:SSL:10m; #SSL 会话缓存类型和大小 ssl_buffer_size 1400; # 1400 bytes to fit in one MTU add_header Strict-Transport-Security max-age=15768000; ssl_stapling on; ssl_stapling_verify on; include wordpress.conf; #error_page 404 /404.html; include enable-php.conf; location ~ .*\.(gif|jpg|jpeg|png|bmp|swf)$ { expires 30d; } location ~ .*\.(js|css)?$ { expires 12h; } location ~ /\. { deny all; } access_log /home/wwwlogs/edlinus.cn.log;#access_log 不需要的可以直接access_log off; } server{ listen 443 ssl http2;#这里做的是www跳转到不带www的网址,不需要的可以删除这一段server代码块 server_name www.edlinus.cn;#修改成你的域名 ssl_certificate /usr/local/nginx/conf/ssl/xxx.crt;#修改证书 ssl_certificate_key /usr/local/nginx/conf/ssl/xxx.key;#修改密钥 return 301 https://edlinus.cn$request_uri;#修改成你的域名 } |
现在用service nginx restart重启Nginx就能看到效果了,你可能会问,那现在80端口不是废了,恩是的,80端口的配置在后面会提及。
二、安装Varnish
CentOS or RedHat:
1 2 3 4 | yum install epel-release rpm --nosignature -i https://repo.varnish-cache.org/redhat/varnish-4.1.el7.rpm (RHEL6使用: rpm --nosignature -i https://repo.varnish-cache.org/redhat/varnish-4.1.el6.rpm) yum install varnish |
更多系统安装方式:https://www.varnish-cache.org/releases/index.html
三、配置Nginx以协同Varnish
重新打开第一步中编辑的Nginx学主机配置文件,在443端口的ssl配置后追加:
1 2 3 4 5 6 7 8 9 | location / { proxy_pass http://127.0.0.1:6081; proxy_set_header X-Real-IP $remote_addr; proxy_set_header X-Forwarded-For $proxy_add_x_forwarded_for; proxy_set_header Host $host; proxy_set_header X-SSL on; proxy_hide_header Vary; proxy_redirect off; } |
将其他关于缓存规则,wordpress配置的代码加到一个新的代码块中也就是实现前文示意图中提到的后端端口8080,例如:
1 2 3 4 5 6 7 8 9 10 11 12 13 14 15 16 17 18 19 20 21 22 23 24 | server{ listen 8080; server_name edlinus.cn; index index.html index.htm index.php default.html default.htm default.php; root /home/wwwroot/edlinus.cn; include wordpress.conf; #error_page 404 /404.html; include enable-php.conf; location ~ .*\.(gif|jpg|jpeg|png|bmp|swf)$ { expires 30d; } location ~ .*\.(js|css)?$ { expires 12h; } location ~ /\. { deny all; } } |
最后再配置一下80端口301跳转到https,新建一个server代码块:
1 2 3 4 5 | server{ listen 80; server_name www.edlinus.cn edlinus.cn;#这里修改成你的域名 return 301 https://edlinus.cn$request_uri;#这里修改成你的域名 } |
设置完成后的conf文件应该有类似于以下的代码结构:
1 2 3 4 5 6 7 8 9 10 11 12 13 14 15 16 17 18 19 20 21 22 23 24 25 26 27 28 29 30 31 32 33 34 35 36 37 38 39 40 41 42 43 44 45 46 47 48 49 50 51 52 53 54 55 56 57 58 59 60 61 62 63 64 65 | server { listen 443 ssl http2; server_name edlinus.cn; ssl_certificate /usr/local/nginx/conf/ssl/xxx.crt; ssl_certificate_key /usr/local/nginx/conf/ssl/xxx.key; ssl_protocols TLSv1 TLSv1.1 TLSv1.2; #允许的协议 ssl_ciphers EECDH+CHACHA20:EECDH+AES128:RSA+AES128:EECDH+AES256:RSA+AES256:EECDH+3DES:RSA+3DES:!MD5; #加密算法(CloudFlare 推荐的加密套件组) ssl_prefer_server_ciphers on; #优化 SSL 加密套件 ssl_session_timeout 10m; #客户端会话缓存时间 ssl_session_cache builtin:1000 shared:SSL:10m; #SSL 会话缓存类型和大小 ssl_buffer_size 1400; # 1400 bytes to fit in one MTU add_header Strict-Transport-Security max-age=15768000; ssl_stapling on; ssl_stapling_verify on; location / { proxy_pass http://127.0.0.1:6081; proxy_set_header X-Real-IP $remote_addr; proxy_set_header X-Forwarded-For $proxy_add_x_forwarded_for; proxy_set_header Host $host; proxy_set_header X-SSL on; proxy_hide_header Vary; proxy_redirect off; } access_log /home/wwwlogs/edlinus.cn.log; } server{ listen 8080; server_name edlinus.cn; index index.html index.htm index.php default.html default.htm default.php; root /home/wwwroot/edlinus.cn; include wordpress.conf; #error_page 404 /404.html; include enable-php.conf; location ~ .*\.(gif|jpg|jpeg|png|bmp|swf)$ { expires 30d; } location ~ .*\.(js|css)?$ { expires 12h; } location ~ /\. { deny all; } } server{ listen 443 ssl http2; server_name www.edlinus.cn; ssl_certificate /usr/local/nginx/conf/ssl/xxx.crt; ssl_certificate_key /usr/local/nginx/conf/ssl/xxx.key; return 301 https://edlinus.cn$request_uri; } server{ listen 80; server_name www.edlinus.cn edlinus.cn; return 301 https://edlinus.cn$request_uri; } |
service nginx restart重启nginx,如果没有报错那么到这里Nginx的配置就已经完成了。
三、Varnish配置
编辑[kbd]/etc/varnish/default.vcl[/kbd],将里面的内容完全替换成以下代码:
1 2 3 4 5 6 7 8 9 10 11 12 13 14 15 16 17 18 19 20 21 22 23 24 25 26 27 28 29 30 31 32 33 34 35 36 37 38 39 40 41 42 43 44 45 46 47 48 49 50 51 52 53 54 55 56 57 58 59 60 61 62 63 64 65 66 67 68 69 70 71 72 73 74 75 76 77 78 79 80 81 82 83 84 85 86 87 88 89 90 91 92 93 94 95 96 97 98 99 100 101 102 103 104 105 106 107 108 109 110 111 112 113 114 115 116 117 118 119 120 121 122 123 124 125 126 127 128 129 130 131 132 133 134 135 136 137 138 139 140 141 142 143 144 145 146 147 148 149 150 151 152 153 154 155 156 157 158 159 160 161 162 163 164 165 166 167 168 169 170 171 172 173 174 175 176 177 178 179 180 181 182 183 184 185 186 187 188 189 190 191 192 193 194 195 196 197 198 199 200 201 202 203 204 205 206 207 208 209 210 211 212 213 214 215 216 217 218 219 220 221 222 223 224 225 226 227 228 229 | vcl 4.0; # Default backend definition. Set this to point to your content server. backend default { .host = "127.0.0.1"; .port = "8080"; .connect_timeout = 600s; .first_byte_timeout = 600s; .between_bytes_timeout = 600s; .max_connections = 800; } # Only allow purging from specific IPs acl purge { "localhost"; "127.0.0.1"; } # This function is used when a request is send by a HTTP client (Browser) sub vcl_recv { #Force specific urls or vhost urls to pass to the backend (not cached) if (req.http.host == "XXXXXXXXXXXXXXXXXXXXXXXX" || req.http.host == "YYYYYYYYYYYYYYYYYYYYYYYY") { return(pass); } # Normalize the header, remove the port (in case you're testing this on various TCP ports) set req.http.Host = regsub(req.http.Host, ":[0-9]+", ""); # Remove has_js and CloudFlare/Google Analytics __* cookies. set req.http.Cookie = regsuball(req.http.Cookie, "(^|;\s*)(_[_a-z]+|has_js)=[^;]*", ""); # Remove a ";" prefix, if present. set req.http.Cookie = regsub(req.http.Cookie, "^;\s*", ""); # Allow purging from ACL if (req.method == "PURGE") { # If not allowed then a error 405 is returned if (!client.ip ~ purge) { return(synth(405, "This IP is not allowed to send PURGE requests.")); } # If allowed, do a cache_lookup -> vlc_hit() or vlc_miss() return (purge); } # Post requests will not be cached if (req.http.Authorization || req.method == "POST") { return (pass); } # --- WordPress specific configuration # Did not cache the admin and login pages if (req.url ~ "wp-(login|admin)" || req.url ~ "preview=true") { return (pass); } # Remove the "has_js" cookie set req.http.Cookie = regsuball(req.http.Cookie, "has_js=[^;]+(; )?", ""); # Remove any Google Analytics based cookies set req.http.Cookie = regsuball(req.http.Cookie, "__utm.=[^;]+(; )?", ""); # Remove the Quant Capital cookies (added by some plugin, all __qca) set req.http.Cookie = regsuball(req.http.Cookie, "__qc.=[^;]+(; )?", ""); # Remove the wp-settings-1 cookie set req.http.Cookie = regsuball(req.http.Cookie, "wp-settings-1=[^;]+(; )?", ""); # Remove the wp-settings-time-1 cookie set req.http.Cookie = regsuball(req.http.Cookie, "wp-settings-time-1=[^;]+(; )?", ""); # Remove the wp test cookie set req.http.Cookie = regsuball(req.http.Cookie, "wordpress_test_cookie=[^;]+(; )?", ""); # Are there cookies left with only spaces or that are empty? if (req.http.cookie ~ "^ *$") { unset req.http.cookie; } # Cache the following files extensions if (req.url ~ "\.(css|js|png|gif|jp(e)?g|swf|ico)") { unset req.http.cookie; } # Normalize Accept-Encoding header and compression # https://www.varnish-cache.org/docs/3.0/tutorial/vary.html if (req.http.Accept-Encoding) { # Do no compress compressed files... if (req.url ~ "\.(jpg|png|gif|gz|tgz|bz2|tbz|mp3|ogg)$") { unset req.http.Accept-Encoding; } elsif (req.http.Accept-Encoding ~ "gzip") { set req.http.Accept-Encoding = "gzip"; } elsif (req.http.Accept-Encoding ~ "deflate") { set req.http.Accept-Encoding = "deflate"; } else { unset req.http.Accept-Encoding; } } # Check the cookies for wordpress-specific items if (req.http.Cookie ~ "wordpress_" || req.http.Cookie ~ "comment_") { return (pass); } if (!req.http.cookie) { unset req.http.cookie; } # --- End of WordPress specific configuration # Did not cache HTTP authentication and HTTP Cookie if (req.http.Authorization || req.http.Cookie) { # Not cacheable by default return (pass); } # Cache all others requests return (hash); } sub vcl_pipe { return (pipe); } sub vcl_pass { return (fetch); } # The data on which the hashing will take place sub vcl_hash { hash_data(req.url); if (req.http.host) { hash_data(req.http.host); } else { hash_data(server.ip); } # If the client supports compression, keep that in a different cache if (req.http.Accept-Encoding) { hash_data(req.http.Accept-Encoding); } return (lookup); } # This function is used when a request is sent by our backend (Nginx server) sub vcl_backend_response { if (bereq.url ~ "XXXXXXXXXXXXXXXXXXXXXXXX" || bereq.url ~ "YYYYYYYYYYYYYYYYYYYYYYYY") { return(deliver); } # Remove some headers we never want to see unset beresp.http.Server; unset beresp.http.X-Powered-By; # For static content strip all backend cookies if (bereq.url ~ "\.(css|js|png|gif|jp(e?)g)|swf|ico") { unset beresp.http.cookie; } # Don't store backend if (bereq.url ~ "wp-(login|admin)" || bereq.url ~ "preview=true") { set beresp.uncacheable = true; set beresp.ttl = 30s; return (deliver); } # Only allow cookies to be set if we're in admin area if (!(bereq.url ~ "(wp-login|wp-admin|preview=true)")) { unset beresp.http.set-cookie; } # don't cache response to posted requests or those with basic auth if ( bereq.method == "POST" || bereq.http.Authorization ) { set beresp.uncacheable = true; set beresp.ttl = 120s; return (deliver); } # don't cache search results if ( bereq.url ~ "\?s=" ){ set beresp.uncacheable = true; set beresp.ttl = 120s; return (deliver); } # only cache status ok if ( beresp.status != 200 ) { set beresp.uncacheable = true; set beresp.ttl = 120s; return (deliver); } # A TTL of 2h set beresp.ttl = 2h; # Define the default grace period to serve cached content set beresp.grace = 30s; return (deliver); } # The routine when we deliver the HTTP request to the user # Last chance to modify headers that are sent to the client sub vcl_deliver { if (obj.hits > 0) { set resp.http.X-Cache = "HIT"; } else { set resp.http.x-Cache = "MISS"; } # Remove some headers: PHP version unset resp.http.X-Powered-By; # Remove some headers: Apache version & OS unset resp.http.Server; # Remove some heanders: Varnish unset resp.http.Via; unset resp.http.X-Varnish; return (deliver); } sub vcl_init { return (ok); } sub vcl_fini { return (ok); } |
service varnish restart 重启varnish,如果没报错那么对Varnish的配置也完成了。
PS:如果不想让Varnish监听默认的6081端口的话,可以在nginx配置中把6081修改成自己定义的端口,之后再编辑[kbd]/etc/default/varnish[/kbd],将DAEMON_OPTS=”-a :6081修改成DAEMON_OPTS=”-a :自定义端口,CentOS7.X版本则是修改[kbd]/etc/varnish/varnish.params[/kbd]中的VARNISH_LISTEN_PORT
四、WordPress配置
现在网站已经可以通过https访问了,但是有个问题,就是css,js,图片等等都是按照http方式加载的,按照W3C的标准,这种mixed content是不安全的,所以这时候需要在wordpress中进行配置,启用https。
在wp-config.php中添加
1 | if ($_SERVER['HTTP_X_SSL'] == 'on') $_SERVER['HTTPS']='on'; |
最后添加一款控制Varnish缓存的WordPress插件就OK了,因为这次实现的方式比较特殊,经过测试Purge Varnish这款插件能够正常使用,后台对插件进行设置时,Varnish Control Terminal填写127.0.0.1:6802,Varnish Control Key填写[kbd]/etc/varnish/screct[/kbd]中的密钥。
Bonjour!